13. Shoot to Edit

This particular “pro-tip” simply means that you should think like an editor when filming. When recording a scene, you’ll want to capture several angles and a few “safety shots”. This means you’ll have choices later when creating your final cut. This will save you time and effort that you might otherwise spend on refilming. Plus, it will prevent you from settling for subpar shots that will make your work look unprofessional.

And when you edit, use a simple video editing software that you can get used to before moving on to more complicated programs. You can learn from our video editing tips, which include simple yet professional techniques aside from the simple cutting, clipping, and correction of video clips and audio levels.

Photo by Fiore: Santa Fe, New Mexico

www.fioreimage.com

#FIOREIMAGE #Videographer #SantaFeVideographer #InternationalVideographer #Filmmaker

12. Time Your Shots

Here are a few videography tips from professional cinematographers that you may not find in many how-to articles. Keep your shots longer than five seconds but not longer than 10 seconds to effectively hold your viewers’ attention. At the same time, remember to keep your shots steady for at least 10 seconds — no panning or zooming before then. Many beginners find these to be extremely helpful in minimizing camera movements, reducing recording time, and keeping their sequences simple during post-production.

Photo by Fiore: Santa Fe, New Mexico

www.fioreimage.com

#FIOREIMAGE #Videographer #SantaFeVideographer #InternationalVideographer #Filmmaker

11. Avoid Shaky Shots

Whether you’re panning, doing a crane shot, or dollying from side to side, you don’t want your shots to look shaky. Aside from possibly making your footage look like home videos, it could make your viewers feel seasick. Keeping your camera on a tripod or any steady surface is key.

Once your camera is set up, try not to move your camera unless you have to. When you do have to start panning or zooming, treat your camera as a full cup of coffee. Keep your speed consistent and don’t make sudden stops.

Photo by Fiore: Santa Fe, New Mexico

www.fioreimage.com

#FIOREIMAGE #Videographer #SantaFeVideographer #InternationalVideographer #Filmmaker

10. Apply Cinematic Techniques

A truly professional-looking video project incorporates a mix of basic camera movements that will not only enhance the storytelling but will also keep your viewers interested. If you want to bring your videography to the next level and really impress your audiences, you may want to apply a few cinematography techniques.

The techniques you choose to use will greatly depend on your level of creativity and how you want to present the scenes, but it’s always ideal to choose just the essential few that will best tell your story. You don’t want to overdo them and end up overwhelming your viewers with the visuals rather than with your story.

Photo by Fiore: Santa Fe, New Mexico

www.fioreimage.com

#FIOREIMAGE #videographer #santafevideographer #Internationalvideographer

9. Evenly Expose Scenes

Another problem that you may encounter when using multiple video cameras to film a scene is ending up with clips that don’t look the same in terms of exposure. The same scene can look darker in one camera and brighter on the other. This is true if you don’t set the same exposure settings, like your frame rate, ISO levels, and aperture. This is why dedicated cine lenses have t-stops. These stand for exact aperture values, instead of the more theoretical f-stop value on regular photography lenses.

For beginners, it may be easier to shoot in controlled settings. You can have the same lighting no matter the time of day and use the same camera with the exposure locked. Yes, may take longer to record. However, it will save you the headache of correcting your exposure during post-production.


Photo by Fiore: Santa Fe, New Mexico

www.fioreimage.com

#FIOREIMAGE #videographer #santafevideographer #Internationalvideographer

8. Set Your White Balance

A real challenge that many professionals go through is temperature and color correction. If you’re using more than one camera to record the same scene, it’s possible for the cameras to have different default color temperatures. This is an issue when using cameras of different brands like Sony and Canon. It can also be a problem when using cameras by the same brand. Can you imagine how distracting it would be to see alternating bluish and warm yellow clips? Set the white balance on all cameras before recording to produce more consistent, professional-looking clips. This will help speed up the editing process and reduce post-production costs in the future.

Photo by Fiore: Santa Fe, New Mexico

www.fioreimage.com

#FIOREIMAGE

#videographer #santafevideographer #Internationalvideographer

7. Use Manual Focus

I know this is a hard one. Everyone is used to auto-focus and it is difficult for some people. However, the more you do it and better you get at it.

While the autofocus feature on your camera can be very handy, it can ruin your recording when it goes in and out of focus while trying to locate your subject in dimly lit scenes. The key is to use the exposure/focus lock on your smartphone or switch to manual focus on your standalone camera, so you can use your own eyes and set the focus yourself.

Setting the focus also allows you to add cool effects to your video, such as with the use of the rack focus technique where you can focus on different objects successively (with the help of a shallow depth of field blurring everything else out) to direct your viewer’s attention. When used properly, it can be a very powerful tool for storytelling.

Photo by Fiore: Cinque Terre, Italy

www.fioreimage.com

#FIOREIMAGE

#videographer #santafevideographer #Internationalvideographer

_MG_1420.jpeg

6. Observe Proper Camera Placement

A common mistake that beginners make is not minding how the lens’ focal length and the camera’s relative distance from the subject are affecting the look of the scene. For close-up shots, never place your camera close to your subject as this can create unattractive facial distortions and make it more challenging for you to crop out the edges of the scene. It’s much easier to place your camera a couple of feet away and carefully zoom in with your camera lens.

But before you go and zoom with your camera, know that you should do this optically (with the lens) instead of digitally (by pinch-zooming your screen) as the latter will degrade the quality of your video clips and possibly make them look pixellated.


Photo by Fiore: Havana, Cuba

www.fioreimage.com

#FIOREIMAGE #videographer #santafevideographer #Internationalvideographer

5. Improve Your Composition

A professional filmmaker or someone from the motion picture industry may be able to spot the work of an amateur during the first few seconds of a video project. That’s still true even if high-end camera equipment was used. So what gives them away? It’s their lack of proper framing and composition.

What many beginners don’t realize is that good videography (especially cinematography) involves more than just aiming your camera at your scene or subject. It involves arranging and allowing visual elements to tell your story. It also means changing your camera’s framing to make the scene look aesthetically pleasing.

Among the most important cinematic videography tips and compositional rules is the Rule of Thirds. This is where you place your subject’s head a little higher (not at the center) of the frame and give them visual breathing or walking space when facing the sides. Another is to remain on the same side of two people talking when taking over-the-shoulder shots. Also, having a foreground and a background to create depth within a scene is crucial.

Photo by Fiore: Florence, Tuscany, Italy

www.fioreimage.com

#FIOREIMAGE

#videographer #santafevideographer #Internationalvideographer

_MG_1658.jpg

4. Keep the Background Simple

Don’t just film anywhere. Make an effort to use a simple background or improve it by removing as much clutter as you can. Many use solid-colored backgrounds — be it a wall, a bedsheet, or backdrop paper — and place themselves (or their subjects) a few feet away from it to avoid casting a shadow.

The key is to minimize elements that will make the scene look cluttered and take attention away from your subject. Although there are themes and storylines that benefit from having a cluttered scene, you may want to focus on improving your videography with the basics and then level up and experiment from there.

https://www.adorama.com/alc/13-videography-tips-for-more-professional-looking-videos/

www.fioreimage.com

#FIOREIMAGE

#videographer #santafevideographer #Internationalvideographer

Screen Shot 2021-08-12 at 9.12.14 AM.png

3. Have Good Lighting

I spend most of the shoot day preparing the lights. There are no excuses for not put some lights on.

One of the biggest secrets to achieving professional-looking videos is to use lighting for your storytelling. During conceptualization, try to be intentional about your lighting. Determine the types of lights that you need and where you will place them to achieve the effect that you want. Or if you’re on a budget and are working with existing lights (like lamps and the sun), think of how you can make it work for your particular scene.

For example, if you want a dramatic-looking scene, you’ll want shadows in the right places. On the contrary, having plenty of light can add cheer and create an ethereal feel, depending on your light placement.

https://www.adorama.com/alc/13-videography-tips-for-more-professional-looking-videos/

www.fioreimage.com

#FIOREIMAGE

#videographer #santafevideographer #Internationalvideographer

Screen Shot 2021-08-04 at 1.57.40 PM.png

2. Plan Your Shoot

Pre-production is the most underestimated aspect of filming. Get ready before any shoot is important. Do not just show up and shoot.

If you’re going to shoot a music video, commercial, or short film, you’ll have much more freedom to plan your full video production from start to finish. To really do it like the pros, create your own storyboard with illustrations of your scenes in sequence. This will help you pre-visualize your final footage and outline your desired shots. It will serve as your guide during shooting and editing, plus it can help you determine the perfect time of the day for shooting, your desired venues, and the right cameras to be used (in case you have several options) prior to filming.

On the other hand, if you’re covering an event, you’re going to want to be as ready as you possibly can. For instance, in wedding videography, the wedding videographer should know how to capture all of the most important moments, and create fantastic videos of the bride, groom, and the wedding party.

A few helpful wedding videography tips to remember:

Have a shot list prepared. This list should include the first kiss, the cake cutting, and other key moments that the couple would want to be immortalized.

Just as there are wedding photography styles, there are also certain shooting styles for wedding videography. Stick to a specific style. Be consistent and use the right one that fits the couple and their event for the perfect cinematic wedding video.


https://www.adorama.com/alc/13-videography-tips-for-more-professional-looking-videos/


www.fioreimage.com

#FIOREIMAGE

#videographer

#santafevideographer

#Internationalvideographer


13 Videography Tips for More Professional-Looking Videos

Videos are more in demand than ever. It usually does not take much remember a few steps can improve your video. I find these steps helpful and anybody can use them easily. Let's start with step one:

Gather Your Equipment

Fortunately for beginners, we live in a time where high-quality digital cameras are made to be affordable for personal and recreational use. You can practice videography with gadgets that you may already have. Consider your iPhone or Android smartphone, as long as you keep these simple things in mind: Use the back camera for better quality footage Shoot in landscape mode (horizontally instead of vertically) Turn on the overlay grid on your screen, if you have it, when shooting video. This gives you a handy guide for keeping your phone level If you have the budget for it, we recommend purchasing a gimbal stabilizer for your camera for steadier handheld shots, an external microphone for better audio, and a reliable video tripod.

https://www.adorama.com/alc/13-videography-tips-for-more-professional-looking-videos/ www.fioreimage.com

#FIOREIMAGE

#videographer

#santafevideographer

#Internationalvideographer

Screen Shot 2021-07-21 at 1.58.35 PM.png

Capturing More Cinematic Footage

Capturing great videos is difficult for a number of reasons. There is a lot of work that goes into creating such work and to achieve the desirable, cinematic feel, you are required to hit a number of markers.

As somebody who loves cinema — particularly the aesthetics and artsy side — it's easy to see how people see high-end videography as reasonably straightforward. As is the case with most things, however, it is straightforward in theory, but in practice, it requires a lot of know-how and nuance.

What is your best tip for capturing great looking video?


Santa Fe Series. Photo by Fiore: Santa Fe, New Mexico.

www.fioreimage.com

#FIOREIMAGE

#videographer

#santafevideographer

#Internationalvideographer

_MG_4497.jpg

The Rule of Thirds

The rule of thirds is a well-known technique but sometimes forgotten. This method will improve your shots and it is easy to use. The photo shows with the help of a grid how can you have your composition done following the rule of thirds. Most of the time you just need to reframe and remember to do it. The rule of thirds is well explained on this website www.capturelandscapes.com or you can ask me for more info at fioreimage@gmail.com


www.fioreimage.com


#FIOREIMAGE

#videographer

#santafevideographer

#Internationalvideographer

Screen Shot 2021-06-10 at 10.52.59 AM.png

Winter Motivation

Last winter I decided to go out and take some pictures of our beautiful city. The night before we got a storm and the next morning was very cold but I decided to put on some extra layers and go anyway. I stick to my plan and it paid off. The point is sometimes we do not want to leave the house for different reasons but it could be worth it.


Santa Fe Series. Photo by Fiore: Santa Fe, New Mexico.

#FIOREIMAGE

#videographer

#santafevideographer

#Internationalvideographer

_MG_4821.jpg

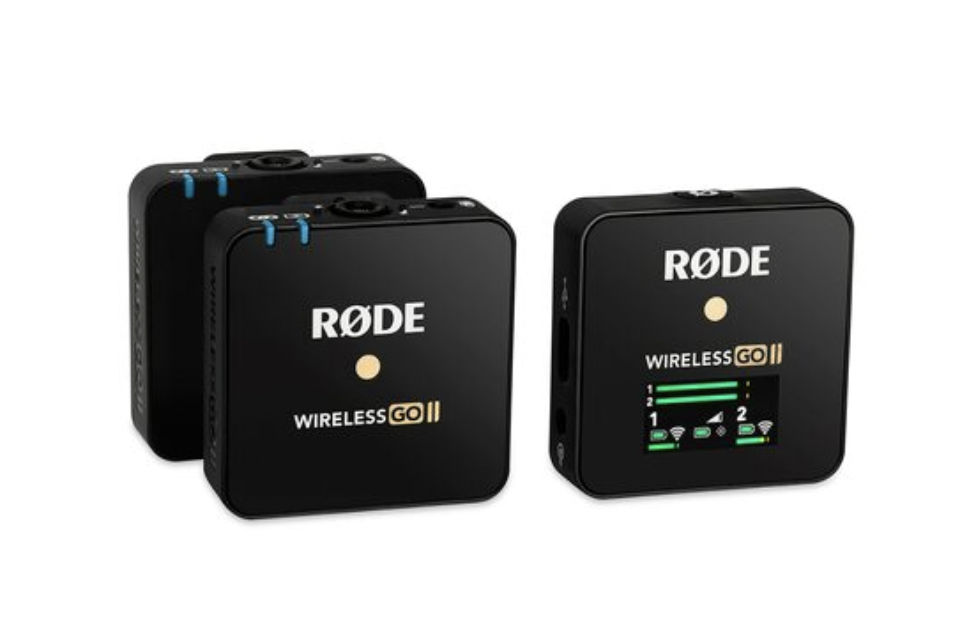
New Duel Wireless Rode Go II Mic System

They finally arrived! It was in backorder but now I have the new Duel Wireless Rode Mic Go II Mic system. There are small and incredibly simple to use. They are rechargeable so I do not have to go through dozens and dozens of batteries. And most importantly great sound quality. Check www.rode.com if you like more info about this product.


#FIOREIMAGE

#videographer

#santafevideographer

#Internationalvideographer

Screen Shot 2021-05-19 at 09.27.35.png

The single biggest mistake people make when taking a photo with their smartphone

It's been in a while that I wanted to write about taking photos with your cell phone. I still see many people vertically taking photos and post on social media with black banners. This is just a suggestion that it is better and more professional to take horizontal photographs, especially videos. I found an article on INSIDER magazine that explains more in detail why you should remember to turn your cell phone horizontally.

https://www.businessinsider.com/taking-iphone-photos-horizontally-2015-8

#FIOREIMAGE

#videographer

#santafevideographer

#Internationalvideographer

Screen Shot 2021-05-12 at 14.14.34.png

The Benefits of Social Media Videos

The overarching benefit of social media videos is that marketers can convey more information in less time. This feature makes them a powerful alternative to blog posts and improves their accessibility and reach. Videos are also incredibly versatile and can range from quick, trending challenges that boost engagement to informative live tutorials that will enhance brand awareness and product familiarity.

There’s also evidence that shows that videos interact better with the various social media algorithms. Facebook released a statistic that videos tend to get more engagement than other types of content, with live videos earning six times more engagement than a pre-recorded video. Please contact me for a free consultation.

Santa Fe Series. Photo by Fiore: Santa Fe, New Mexico.

#FIOREIMAGE

#videographer

#santafevideographer

#Internationalvideographer

_MG_4482.jpg

Video Process

Creating a video takes time but most important preparation. It takes as much time to organize a shoot as filming it. Here, some steps that I use to prepare for a video.

First, come up with a concept. Before you can do anything, you'll need to decide on a concept for your video. What do you want to accomplish with the video? Who is your audience? What message do you want to get across? Without this crucial first step, you run the risk of making a video that fails to speak to your audience and advance your marketing goals.

Second, write a script. With the concept dialed in, it's time to sit down and write a script. Your script should be easy to understand, fit within your target video time, and include any changes in camera angle, wardrobe, or background.

Third, perform pre-production planning. At a minimum, pre-production planning consists of scouting a location, getting permits if required, procuring all of the equipment you need, reviewing your script, speaking with actors about their roles, deciding on a budget, and choosing a time and day for the shoot. As I said, the above list is very basic. There are seemingly endless other details—camera batteries, make-up, wardrobe, etc.—that need to be addressed before a shoot.

Fourth, shoot the video. The big day! Just like the pre-production planning, there are a million details to get right on the day of the shoot. If you've done the required work from the first three steps, things should go smoothly. If not, you're in for a day of frustration.

Santa Fe Series. Photo by Fiore: Santa Fe, New Mexico.

#FIOREIMAGE

#videographer

#santafevideographer

#Internationalvideographer

_MG_4544.jpg